
Solar Passive Greenhouse
For 4 season harvest
Greenhouse Photos | Glossary for Beginners We spent about a year researching various solar passive greenhouses, and all the techniques to make them work
well, and then added a few techniques of our own. The result: A wildly successful solar passive greenhouse producing
abundant crops in Iowa - where it gets down to 10-20 below zero.
We spent about a year researching various solar passive greenhouses, and all the techniques to make them work
well, and then added a few techniques of our own. The result: A wildly successful solar passive greenhouse producing
abundant crops in Iowa - where it gets down to 10-20 below zero.
- Our Intentions
- After years of plastic covered tunnels (plastic didn't last that long), and small (but effective) cold frames, we wanted a greenhouse that would last a long time without substantial annual maintenance.
- We decided to spend about $2000-3000, and were willing to use our own labor as much as possible. (You can do it for less!!)
- We wanted a greenhouse that stood independent of electricity or auxiliary heat sources.
- We wanted to produce all of our cool season vegetables with a wide variety of plants - in abundance - all winter
- We understood that 4 season harvest means that there's a lot of growing in the fall, not much growth, but a lot of harvest in the winter, and then as the days begin to get longer, growth takes off.
- We wanted a greenhouse that would be as easy to maintain and use when we were ninety as when we were fifty.
- The result We discovered the first year, that by March/April there was so much new growth that we couldn't begin to keep up - so we
were begging our neighbors to come and cut several varieties each of kale, chard, cabbage, pac choi, tat soi, beet greens, parsley,
cilantro, carrots, mache, claytonia, lettuce and violets! Last frost here is May 10th, so we were still going full
steam well before the usual planting season.
After several years we removed one of the 3 planting beds, reducing our growing space from ~170 sf to ~110sq - still more than enough room for more than enough greens, carrots, beets, leeks (for next year), lettuces, herbs and the usual cool weather crops.
We also now let the greenhouse go dormant in the summer, using only the outside garden, but letting water still collect in the barrels for help watering the adjacent small fruit garden.

- Crop planning How much food do you need? Sit down with a good resource like John Jeavons "How to grow more food
than you thought possible." Consider what square footage of planting area you need. We settled on 170 square feet of planting area for 2 adults - we eat a lot of vegetables -
and this turned out to be way more than we needed - so we give a lot away. After 3 years we reduced our planting area to about 110 sq ft.
- Square footage of planting area
- Greenhouse footprint/layout We decided that we wanted to be able to comfortably walk around most of the planting
beds (having earlier had plastic tunnels in which our head or shovel were continuously
backing into the plastic). Therefore, we decided on a 14' x 24' greenhouse footprint, with 3 planting beds - two longitudinal,
and one crosswise at the opposite end of the door.
- Square footage of greenhouse
- Planting bed layout
- Site location/orientation Enough sun is essential. In the winter the
sun rises in the SE, crosses the southern sky, and sets in the SW.
Therefore, you need to make sure that there are no trees or buildings blocking your winter
sun. (Some blocking summer sun is ok).
- Nothing shading to the south east, south & southwest
- Consider angle of sun - relative to height of and distance to adjacent buildings, trees to the south
- Wind protection to north is good.
- Shade to the NW is ok, since in the summer you'll probably have enough light and more heat than you need.
- Overall greenhouse design After a lot of research we decided on a part/hoop & part stick structure greenhouse.
- We wanted a greenhouse that would last a long time without substantial annual maintenance. So we graduated to 8-year guaranteed, 20-25-year life polycarbonate twinwall.
- The hoop part, the south side and the east and west ends, was covered with polycarbonate for maximum light gain in the winter, and good R value
- The north side was a 2x4 roof and wall, heavily insulated and lined on the inside with more reflective insulation to hold that heat, and reflect the ambient (indirect) light from the south back into the center.
- Water barrels, for watering and passive heat source, were located on a popout in the north wall, in order to keep the foot print small, but allow maximum room inside.
- Road stone was put in the excavation to store heat and prevent rodents from entering ... at least from that direction.
- The 'foundation' was a 12" x 8" 'concrete beam, reinforced with rebar - solid anchor for the structure
- The perimeter, underground, was insulated with 2" of pink foam solid insulation, with flashing outside it to protect the foam.
- Since we have clay soil here in SE Iowa, we added a modest drainage system.
- We have about 125 sq ft of roof area, which collects about 1 55 gallon drum of rain water for a little less than 1" of rain.
- We have an exterior rain barrel, collecting water from the roof, which is connected to five water barrels inside with an interior valve to shut off the exterior barrel, and an exterior quick release so that the outside barrel can be removed in the winter.
- Sitework You aren't going to be providing water or electricity to your greenhouse - so that's moot.
Excavate down to clay, about 18", stockpiling topsoil for later. If you have clay soil, some drainage is a really good
idea. You'll be adding a very simple drainage system around the edge, and perimeter insulation.
 Perimeter Flashing & Insulation Perimeter insulation is really essential. You want to keep whatever warmth is
inside the greenhouse ... inside. A lot of heat leaks out below ground. The Scandinavians developed a system, now widely
used, for shallow foundations which relies on perimeter insulation rather than having to go deep into the soil for a foundation.
And a layer of flashing or metal outside the insulation keep rodents from happily burrowing inside the insulation. By going
deep enough, down to clay, it makes it harder for them little darlin' critters - who will be absolutely delighted to dig
up your growing planting area inside.
Perimeter Flashing & Insulation Perimeter insulation is really essential. You want to keep whatever warmth is
inside the greenhouse ... inside. A lot of heat leaks out below ground. The Scandinavians developed a system, now widely
used, for shallow foundations which relies on perimeter insulation rather than having to go deep into the soil for a foundation.
And a layer of flashing or metal outside the insulation keep rodents from happily burrowing inside the insulation. By going
deep enough, down to clay, it makes it harder for them little darlin' critters - who will be absolutely delighted to dig
up your growing planting area inside.
- Drainage If you have sandy soil, prob don't need this. If you have clay soil - it's a
really good idea
- Backfill perimeter trench So, from the steps above, you've got 24" of flashing with 24" of
insulation around the perimeter, you've got some drain tile in the trench, you've got some stockpiled
gravel.
- Stone (I'm calling the fine pea gravel around the drainage "gravel" and the heavier road stone, or river rock, or
whatever is cheaper, "stone"). We used road stone - 1" and larger limestone here in SE Iowa - you can use whatever is cheapest.
You want to end up with no stone under your planting beds, about 6" of stone under your 'simple foundation', and
about 12" of stone around the planting beds. For us, that was about 7-8 tons, delivered in 2 yard loads so we could
schlep it around with a wheelbarrow. Great exercise! We just started ordering it, and when it was used up, ordered
more until we had enough.
- Foundation Start by creating a solid shelf of gravel around the perimeter, at least 6" deep and about 2-3' wide. You won't want gravel
under your planting bed, ultimately, but you do want a solid shelf that you can work on. You'll be compacting it,
mechanically or by hand, you'll build forms (and they can't be too strong), you'll place some rebar, and pour concrete. We'll go through it step by step.
Of course, a concrete foundation is probably not essential but we did one because.
- With Iowa's high winds we wanted to be dang sure that the greenhouse would be solidly anchored and not blow away.
- We wanted to make it hard for rodents, like chipmunks to get in and dig everything up inside
- We wanted to have a good solid foundation to fasten the pvc pipe/rebar ribs of the greenhouse
- Building the planting beds We had lots of ideas for inexpensive walls for the planting beds, ranging from scavenged
lumber to old garage door panels. But we finally bit the bullet and built our own of 1/4" plywood. The problem is that anything wooden which
is in contact with soil is
going to eventually rot - the question is - how long before it does so and how much will it matter when it does. Perhaps it doesn't
really matter.
 Building the north wall, end 2x4 walls We built short walls for the east and west ends, about 6-8 feet long, going on the north ends of the east and west walls.
We built a long wall for the north side, designing a 10' popout for 5 plastic water barrels.
Building the north wall, end 2x4 walls We built short walls for the east and west ends, about 6-8 feet long, going on the north ends of the east and west walls.
We built a long wall for the north side, designing a 10' popout for 5 plastic water barrels.
I'll try to finish the rest of the detailed info this some day ...
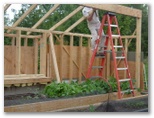
- Building the polycarbonate hoop structure
- Building the polycarbonate end walls
- Covering/fastening the polycarbonate
- Diagonal/cross bracing
- Installing the water barrels
- Getting ready for winter
- Getting ready for summer
@copy 2000-2025, Jennifer Miller All rights reserved