
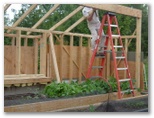
Construction of North, NE & NW 2x4 Walls
 Building the north wall, end 2x4 walls We built short walls for the east and west ends, about 6-8 feet long, going on the north ends of the east and west walls.
We built a long wall for the north side, designing a 10' popout for 5 plastic water barrels.
Building the north wall, end 2x4 walls We built short walls for the east and west ends, about 6-8 feet long, going on the north ends of the east and west walls.
We built a long wall for the north side, designing a 10' popout for 5 plastic water barrels.
- We planned to balance the water barrels, centered on the wall, 1/2 in and 1/2 out. Since the water barrels were 22" in diameter, we assumed they'd protrude in and out 1/2 that, and allowed enough room for them in the popup. Were we doing it again, we'd make the popout go out an inch or so more, since we later decided to squeeze in some more insulation between the outside of the water barrels and the outside wall.
- Underneath the section where the water barrels were to be located, we placed doubled studs every foot to handle the additional weight. A 55' gallon drum of water weighs about 400#. (Also, we'd added an extra piece of rebar in the concrete below the barrels.
- We added 1/2" exterior plywood to the outside.
- When we built the endwalls, we built up a solid post on each end that would support a beam the length of the greenhouse.
- We tilted the endwalls up into place, and the north wall, and tied them all together with a top plate
- We nailed the walls into the bottom plate (in a few cases where the anchor bolts were too high we had to bore out a space), using angles, to maximum the hold down value of the nails.
- We added a few hurricane tie downs between the bottom of the stud walls and the bottom plate.
- We built up a beam to go from one end of the greenhouse to the other, to be underneath the edge of the wooden part of the roof. We used various salvaged 2x 10s, plywood, spacers, whatever.
- We dug a hole in the dirt under the middle of the beam (where there was a planting bed), stuck in a length of 6" pvc pipe down to clay, stuck in a couple pieces of rebar for good measure, and added concrete. We left the center piece of rebar sticking up to receive a hole that we'd make in a future post.
- After the concrete set - we waited a good 3 days, we installed a post, and with the help of friends got the beam up in place on top of the ends of the end walls, and on top of the beam.
- Next were the rafters - we used 2x4s, 2' O.C. and secured them soundly to the top plates with hurricane tie downs.
- We framed the popout, adding sturdy (3x4s, salvaged from pallets) ~2' long pieces every foot to support the weight of the water barrels and distribute their weight evenly along the wall, stuffed insulation in between the 3x4s, and covered it with 1" exterior plywood for a firm, stable, sturdy base for the water barrel's and again, to help distribute the weight evenly.
- We covered the walls with 1/2" exterior plywood, and the roof with 3/4" exterior plywood.
- Important We caulked every seam of the exterior walls carefully, since wind would be a real enemy.
- We painted the exterior walls w/ exterior primer and a couple of coats of exterior house paint.
- We roofed the roof portion with tarpaper, and roll roofing, tarring it well against wind.
2 x 4 Walls
@copy 2000-2025, Jennifer Miller All rights reserved